 I manage TED’s online community from my home on the West Coast, and while many of my interactions are with people based all over the world, the majority of my colleagues are based across the country at TED HQ in New York City. As anyone who works remotely knows, attending meetings as a giant videoconferencing head-on-the-wall isn’t nearly as much fun as having a real seat at the table. So I started thinking.
The obvious solution would be to get hold of a telepresence robot. That’s the technology that allowed Edward Snowden to trundle onto stage at TED2014. But those are expensive, and I love trying to build things myself. I had an iPad with FaceTime, and I thought I might be able to use it to get a seat at the conference table.
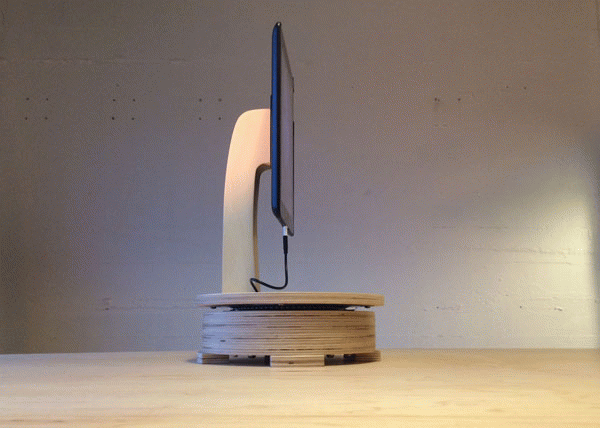
Thus, after much garage tinkering, allow me to introduce… the Rotate-mo-tron 4000! With this handy little ‘bot, I’m able to control the iPad from 3,000 miles away. I can rotate it 180 degrees to look left and right, letting me follow the conversation and make eye contact with individuals as they speak. Co-workers can pick up the stand and tote me around the office if there’s a last-minute room change — and I once chatted with a fellow iPad-enabled remote worker in the office kitchen. Two iPads talking to each other; great fun. And, best of all, it uses the iPad’s built-in wi-fi to control the rotation, making it effortless to connect to my remote web controls.
Interested in building something like this? You’ll need:
Hardware:
- A bluetooth-enabled Arduino (I’m using the Blend Micro from RedBearLabs)
- A servo
- A Bluetooth 4-enabled iPad (older iPads would work with a different Arduino and iOS app)
- A Lazy Susan stand to hold it all (mine was CNC-routed thanks to the guys at SuperFab)
- A couple of USB cables, soldering equipment, and a few other odds and ends.
Below, find the very surface, basic instructions. If you are planning to start building, please check out my GitHub repo, with more information and project files »
- Cut/route the pieces for your iPad stand using ½” plywood. A CNC pattern is included in the project files. I also hand-routed two ¼” ledges for the servo mount; consider adding them in the file.
- Glue together the layers for the base and neck, sand and apply your favorite finish.
- Drill and place a hanger bolt to hold the iPad using a Grifiti Nootle tripod mount (or similar).
- Find the center of the circle for gear placement and your Lazy Susan attachments. (This part is tricky; improvements welcome!)
- Attach the neck to the circle, then connect the circle and base using a 6″ Lazy Susan part.
- Mount the servo and gears. I used a standard Futaba servo like this, and two 1″ gears.
- Splice a few good-quality micro USB cables together to provide 5v power to the iPad, servo, and Blend Micro. Apple’s micro USB to Lightning adapter is easier (and cheaper) than hacking actual Lightning cables.
- Solder and heat-shrink the splices.
- Use a strain relief connector to prevent the USB cable from being yanked out.
- Mount the Blend Micro and use cable clips to keep the wires organized.
- Attach the bottom door with a single hinge and attach the feet.
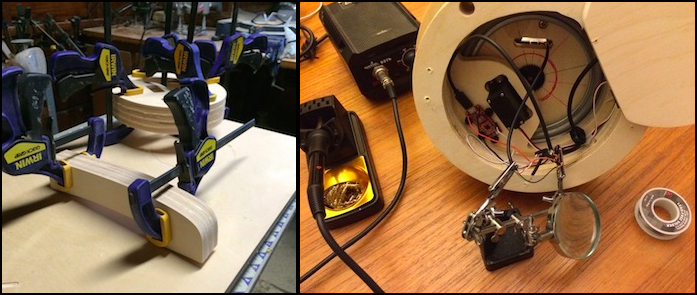
The gluing process, and a look at the innards of the Rotate-mo-tron.
Software:
- A web app with a slider to control the device via the internet.
- An iOS app to listen for slider adjustments.
The software instructions are a little more complicated. If you are interested, hop over to the project files »
Happy building!
Comments (6)